
And how can they improve my freediving?
First-time freedivers are often asking about a ‘magic bullet’ that will unlock their breath holds; a secret trick that enables us to stay down for so long. Perhaps it’s because seemingly anyone can become a freediver. And rightfully so, anyone can, and some of the first lessons I teach involve simple adjustments to the way we approach holding our breath that do result in quick improvements. It’s important however to progress naturally through the sport. To know our limits and push them gently. Apnea tables provide a means to train our breath hold, allowing our bodies to adapt safely and gradually.
What is an apnea table?
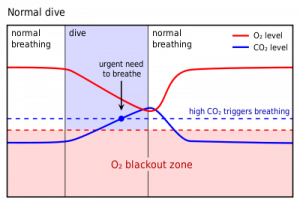
You’ll remember from your lectures that the currencies of the breath hold are carbon dioxide (CO2) and oxygen (O2). When we are under water, we need to reduce our body’s consumption of O2 and reduce our body’s production of CO2. The more that we dive, the more that our bodies adapt and get used to low levels of oxygen and high levels of carbon dioxide. Apnea tables are designed as an exercise to encourage this adaptation without the need for actually diving.
The concept is simple. Apnea tables designed to improve the body’s tolerance to CO2 will decrease the rest time between successive breath holds in an attempt to slowly build a residual concentration of CO2 in the lungs. An O2 table will do the opposite by holding rest times constant and increasing the duration of each breath hold. The beauty of these exercises is they don’t require water! Practice your apnea tables on the couch in front of the TV, or in bed just before going to sleep. Remember your dive safety and always have a buddy nearby, even when dry training!
Where can I find apnea tables?
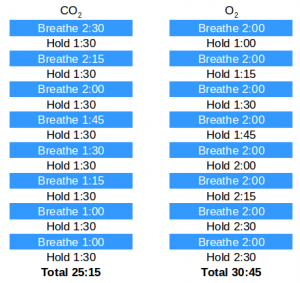
Design an apnea table yourself! You can find pre-made tables online, and there are also many apps and websites that will design them for you (we plan to review some in the future), but it’s also very simple to make your own. Let’s start with a CO2 table. Begin with a 2 minute, 30 seconds breathe up. Then take your personal best breath hold and hold for 50% of that time. Repeat this process, reducing the breathing rests by 15 seconds each time, for no more than 8 cycles. An O2 apnea table is similarly designed. Begin with a 2 minute breathe up and slowly build to 80% of your personal best breath hold by increasing you breath hold in 15 second increments, holding the breathing rests constant at 2 minutes. Sample tables based on a 3 minute personal best can be found on the right.
It can be tricky to stay focused and relaxed, and keep track of times, so we encourage running through these tables with a friend. There are also a number of apps available that will design a customised table, and talk you through it with audio cues! (We like STAmina and iHoldBreath) You can also find mixed goal tables, and contraction based apnea tables (untimed breath holds, holding simply until you experience the first contraction) .
Practice these a few times a week and you should see improvements in no time! Come put your skills to use on one of our citizen science days.
Do you want more in-depth instruction in freediving, scuba diving and marine biology?